Morning y’all!
I’ve been sloooowly picking away at all the DIY projects I want to do in my house, there are still many more to do. When you’re working full time AND doing reno projects at other homes it’s so hard to get your own stuff done!
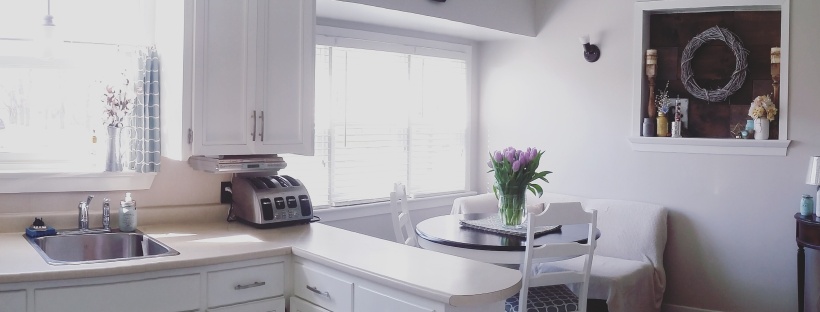
When we bought our house the kitchen was ugly outdated. I’m talkin’ wallpaper covering every inch of the walls (with cute little fruit baskets plastered all over it) and a lovely floral border on TOP of the wallpaper. There was carpet (yup, you heard that right) in the ‘eat in’ part of the kitchen… it was just bad… but I knew it had potential. We ripped all the wallpaper down and painted it a dark olive-y green, because I loved the natural wood and thought it would go best with it.
WELL, it stayed that way until about a year ago because I had no idea where to start.


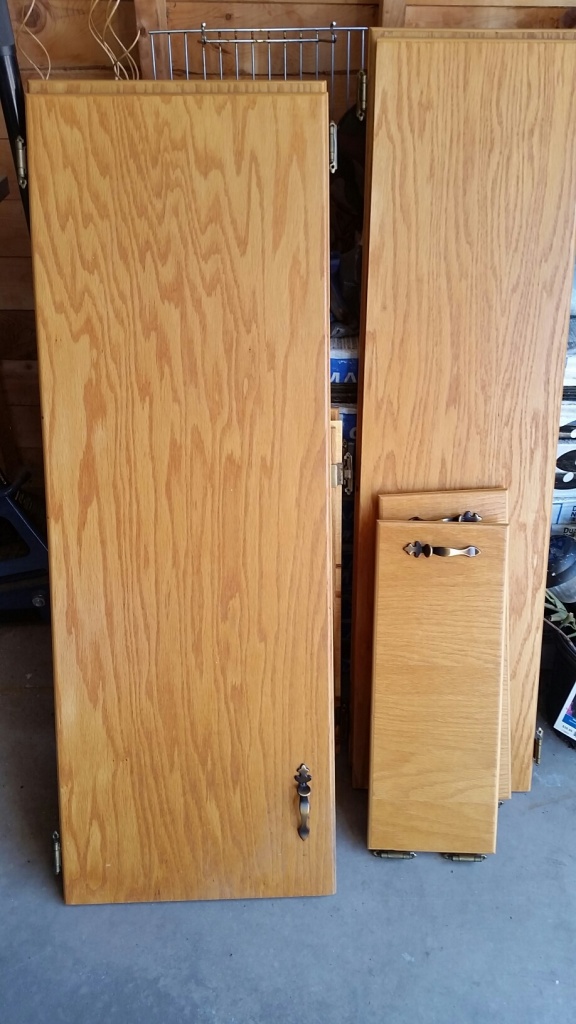
So, one day I got up… looked at the cupboards and thought “No. Just no.”… and I started taking the kitchen apart. I remembered to NUMBER THE DOORS first however (never, ever start a big cabinet project without numbering your doors and hardware)!
If you’ve ever painted your kitchen cabinets before, you’ll know how BAD a kitchen looks without any doors.


That my friends is called incentive. You don’t want anyone stopping by your place and seeing what a terrifying sight was hidden behind those doors, do you?
After numbering the doors and hardware, I took them outside to our garage and cleaned them with TSP. It is very important to have a clean surface before you paint.

Once I had clean doors I primed them with Zinsser Cover Stain, because I’m lazy and didn’t want to sand. This primer works well on high-gloss surfaces, but sanding will definitely make the primer adhere better.
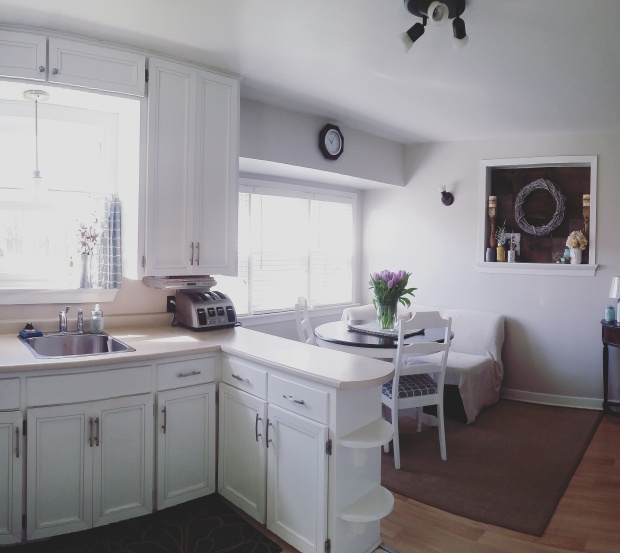
Once it was primed and dry, I painted my cabinet doors. The color I chose was Benjamin Moore Snowfall White, it’s a beautiful creamy white color.
I used BEHR Paint & Primer In One, I LOVE this stuff it’s great for cabinets and trim.


Okay, now the fun part. I knew I wanted to add dimension to our cabinets, they were flat and even though they looked better painted white they were now flat, white cabinets. Boring. Enter, Pinterest.
I found so many posts and pins showing how people added trim to their flat cabinets and it looked great (and easy!). I decided this would be a great way to update the doors on a budget. I went to Home Depot and found some trim that I thought would look really good, it was also really inexpensive ($4.00ish/8 foot length), SCORE!
After I got it home I started cutting right away because I was so excited. Then I realized this isn’t as easy as I thought it would be. My cuts were off, I was cutting it backwards… I was ready to quit and burn the doors.
Remember that incentive I was telling you about? That’s what pushed me through… my ugly soup cans made me keep going. Thank you Campbell’s soup.

Okay, after I finally got my cuts right I used Liquid Nails on the back to attach them to the doors and then to secure them I used a brad nailer and put some small brad nails into the back of the door. NOW I can start to see the light.
Once I had all my doors done, I rolled back over them with my BEHR paint.
I spray painted the hinges a brushed nickel color and added new handles.
In the meantime while I was working away at my cabinet doors, I also painted my kitchen walls and trim. I used Benjamin Moore “Balboa Mist” on the walls and “Snowfall White” (aka left over paint from the cabinets) on the trim.


Once I hung my doors back up, we have an almost new kitchen. Wow, what a difference.
Above our sink we used to have some decorative wood trim as well as a lovely fluorescent light. I miss the buzzing and humming of that light…. said no one ever.
The decorative trim was ripped off faster than a speeding bullet taken down and a new ($10 clearance) pendant light was added.


We took down our old bamboo blinds and replaced them with white faux wooden blinds.
This was one of our biggest costs in the whole kitchen!
I was given an old broken pedestal table from my brother, so I made that over and painted/reupholstered our existing chairs. I’ll tell you how I did that another day.

I added some ‘farmhouse chic’ decor pieces around the kitchen and that’s it!
This kitchen makeover was done for under $400. Not bad huh?

I hope you found this helpful and it gives you motivation to tackle your kitchen… or any room!
If you have any questions about painting cabinets, feel free to ask!
Thanks for stopping by!
Pamela

Looks nice! Good job!
LikeLiked by 1 person
Thanks girl!!
LikeLiked by 1 person
Wow.. The lighter colours makes such a difference, Looks amazing!
LikeLiked by 1 person
Thank you!!
LikeLiked by 1 person